Designing a Teddy Bear Valentine Cookie Cutter in Canva (Fast!)
I have one final Valentine’s Day design I wanted to create, and this time it’s a teddy bear holding a heart. Going into this one, I was pretty confident I could find a graphic in Canva Elements that already matched what I was visualizing or at least something that would require very minimal editing. My goal was speed.
I also wanted to walk you through my thinking and share my process, because I’ve seen a lot of questions recently in 3D printing Facebook groups about how people are designing their cookie cutters, especially when using Canva. This project is a great example of how quickly you can go from idea to printable STL when you know what to look for.
Starting in Canva: Setting Up the Search
I begin by choosing a Facebook post template in Canva. I do this a lot not because I need the layout, but because it gives me a clean, predictably sized blank slate to work from.
Next, I head to Elements and search for “teddy bear holding heart.” Since I know I want a graphic element (not a photo), I click See all, scroll all the way to the right, and use the Price filter to select Free. This is an important step if you want to avoid accidentally designing with paid elements.
Now it’s time to scroll and evaluate options.
Evaluating Teddy Bear Options (What I’m Looking For)
As I scroll, I’m not just looking for something cute, I’m thinking like a cutter designer. I want:
-
Clear, smooth outlines,
-
A front-facing pose,
-
Minimal gaps or awkward overlaps, and
-
Built-in “bump-outs” that will translate nicely into a cutter and help me visually when decorating.
Here’s how my decision-making went:
Option 1: Bear Holding a Heart-Shaped Chocolate Box
This one had some pros. His arms were already positioned to hold something, and the heart-shaped box helped me visualize how the finished cookie might look. He was also facing straight on, which is great. The downside? It was only his upper body. I really wanted the full bear, so I added him to my project as a possibility, then kept looking.
Option 2: Sitting Bear with Arms at His Sides
Super cute but his arms were straight down, which meant I’d have to reposition them to make him hold a heart. Since this design was about minimal editing and fast cutter creation, I skipped adding him to my project as a possibility.
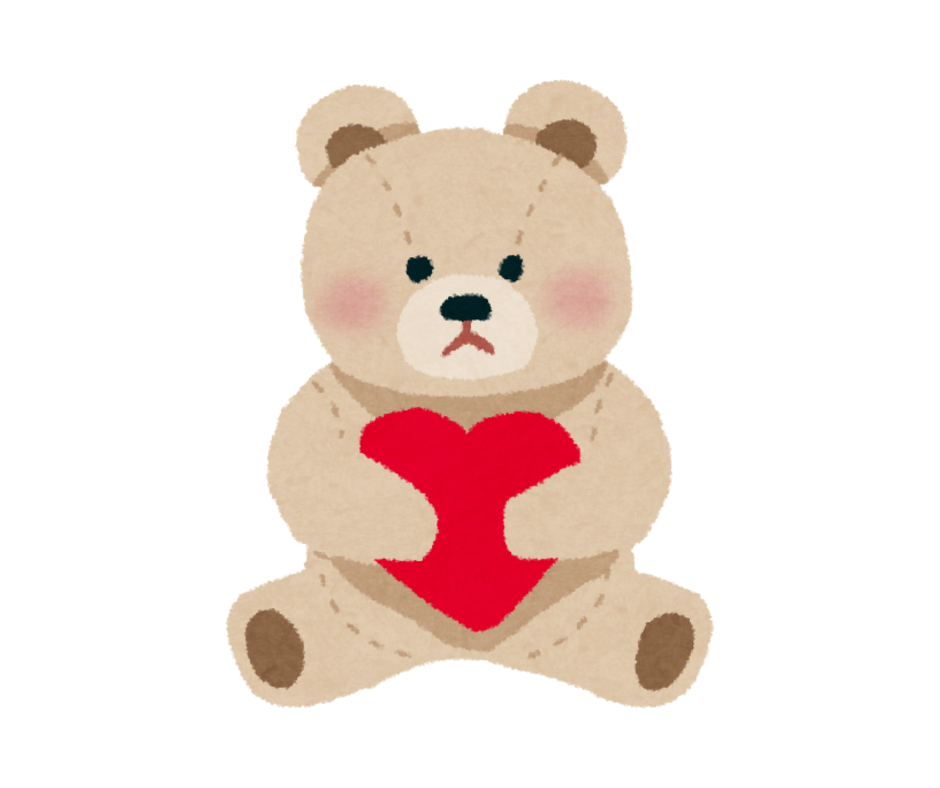
Option 3: Sitting Bear Holding a Big Heart
This was much closer to what I wanted. He was sitting, holding a heart, and facing forward. I added him to a second page and resized him. However, I kept searching because I really wanted the heart to be bigger, with bump-outs in the cutter shape to guide me when decorating.
Option 4: Almost Perfect but Messy Lines
This bear had a large heart, was facing head-on, and even had a cute little head tilt. It’s a fun design but the outline wasn’t super clean. I could fix that in Cookie Design Lab (and that’s one of its strengths), but for this tutorial I wanted the simplest possible conversion. So I added him as a third option and went back one more time.

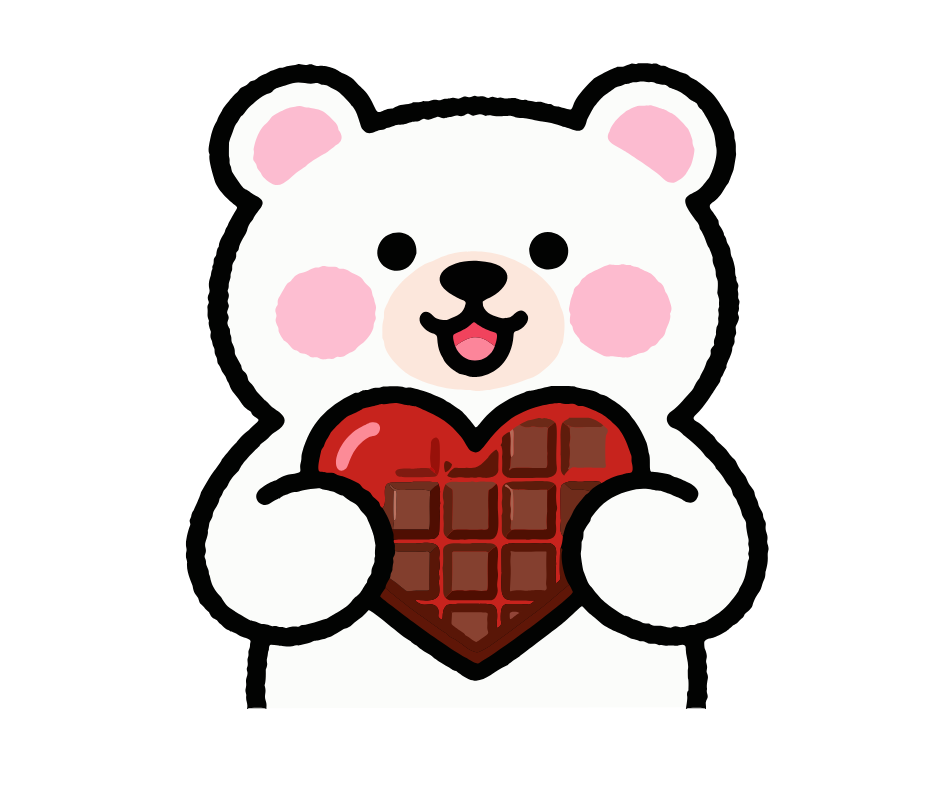
Option 5: The Winner
The fourth bear I found was exactly what I was looking for:
-
He’s holding a big heart, creating natural bump-outs,
-
His arms wrap the heart nicely (although I’ll probably pipe them differently than the drawing),
-
The bottom of the heart stays within his body, creating a cleaner bottom outline,
-
He’s facing straight on, and
-
The lines are clean and smooth.
I knew immediately this would convert into a cutter with almost no effort.

Converting the Design in Cookie Design Lab
I added this bear to my design, resized it, named the file, and downloaded only page 4 to upload into Cookie Design Lab. When I uploaded the image, my number of points was set to 50. I increased it to 120, which instantly smoothed the outline. That was the only change I needed to make to the cutter shape itself.
Sizing the Cutter
The image was tall and narrow, so I leaned into that trend. Tall, skinny cutters have been popular for a few years now, and this shape works beautifully alone or as a two cookie set. I could see pairing the teddy bear with a tall, skinny coffee cookie, for example. So I settled on 3.75 inches tall by just under 2.5 inches wide. This felt modern, elegant, and very usable to me.
From there, I finished with my usual steps:
-
Adding the cutter name,
-
Adding a rounded handle, and
-
Confirming my preferred blade and wall settings (mostly just to show in the YouTube video).
I personally like the default CDL settings (an advantage of being the co-creator, I guess), but one of the best features of Cookie Design Lab is that you can create unlimited saved cutter settings. That means you can have fast-print settings for one-time use and heavier-duty settings for cutters you’ll use again and again. This teddy bear feels versatile enough that a sturdier cutter makes sense to me.
How I’d Use This Teddy Bear Cutter
This design is far from a one-holiday cutter. I’d absolutely reuse it for:
-
Mother’s Day,
-
Teacher Appreciation Week,
-
Baby showers, and
-
Possibly even back-to-school sets.
All I’d need to do is create some new tags or add a plaque cutter with a coordinating phrase.
Final Takeaway: Designing Fast, Successful Cutters
From searching Canva to downloading my STL, this entire process took about three minutes.
When you’re trying to convert existing images into cookie cutters quickly, keep these things in mind:
-
Look for clear, smooth outlines,
-
Choose designs that are already close to your vision,
-
Avoid excessive gaps, overlaps, or fine details, and
-
Favor designs that are already oriented properly (e.g. front facing).
With the right image and the right tools, designing your own cutters really can be this easy.
Now onto decorating! Click here to download the image and here to download the STL.
New to 3D printing your own cookie cutters at home? Welcome, prepare to become addicted! There’s nothing quite like being able to get the exact cutter you want and printing it at home instead of waiting a week (or two) for it to get shipped to you. Here are Cookie Design Lab, we’re made by and for bakers, so we’ve created a tool that is accessible to everyone. Check out our posts or our YouTube videos and see for yourself. Ready to try CDL? Email us at [email protected] for a free one week trial!