Designing a “Cool Chick” Easter Cookie Cutter to 3D Print at Home
So far in our Easter cutter series, we’ve focused on classic designs—eggs, bunnies, carrots—the kinds of cookie cutters that work for Easter baskets, place settings, and boxed sets year after year.
Today, I wanted to switch it up.
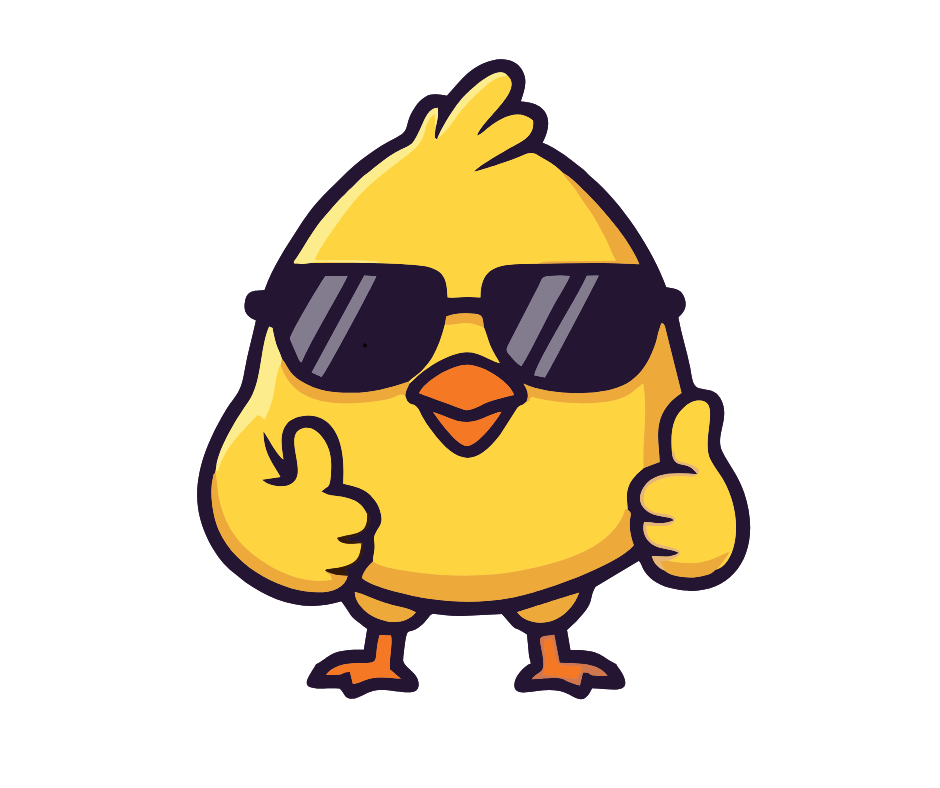
This cookie cutter is not classic—it’s fun, a little cheeky, and very clearly made for kids (or kids-at-heart). Meet the Cool Chick Easter cookie cutter: sunglasses on, confidence high, and absolutely ready to steal the spotlight in an Easter basket.
If you’re designing your own 3D printed cookie cutters at home, this is a great example of how to take a playful image and turn it into a clean, usable STL file—even when the original artwork has details that might not translate perfectly to cookie form.
Finding a Fun Chick Graphic in Canva
I start, as usual, with a Facebook post template in Canva as my blank canvas.
This time, I search Canva Elements for:
-
“cool chick”
-
And, coincidentally, “nerdy chick”
The nerdy chicks tended to have reading glasses, while the cool chick I chose had sunglasses—and honestly, he looks like the kind of chick who wears them at night.
The image I selected is a Canva Pro (paid) element, but you could absolutely recreate something similar using free elements. (I did exactly that for my Valentine’s 6–7 teddy bears—if you want to see how, check out that post.)
One thing I notice right away: The space between the chick’s legs looks fragile for a cookie.
That’s not something I worry about in Canva—I know Cookie Design Lab is the better place to solve that problem.
I name the design, download it, and move into CDL.
Uploading into Cookie Design Lab and Fixing Fragile Areas
Once uploaded into Cookie Design Lab, my concern is confirmed: The area between the chick’s legs would absolutely snap in cookie form.
This is where cookie cutter design software that allows editing really matters—something many bakers struggle with when using more limited tools or Cookie CAD alternatives.
To fix it:
-
I highlight all the points between the legs
-
Delete them to remove that fragile cut line entirely
Now I have to decide:
-
Do I keep the little bumps around the feet?
-
Or turn that section into a straight line for easier piping?
CDL gives me both options.
I try using the “convert selected points to a horizontal line” feature, which would make decorating easier—but I decide I actually like the bumps. They add character and visual interest.
So I undo my last move (another CDL feature I use constantly) and keep the original shape.
Sizing, Orientation, and Cutter Settings
Next up: sizing and structure.
If you’ve read my other posts, you know I typically land between 3.25–3.5 inches for height or width. For this chick, the sweet spot is:
-
3.5 inches tall
-
3 inches wide
That size makes it perfect for:
-
An Easter basket cookie
-
A single standout cookie
-
A fun add-on in a kids’ set
I add the cutter name, adjust it with the slider, and click “flip left/right” so the cutter orientation matches the original image—especially helpful if I decide to print the design with edible ink.
Then I move on to:
-
Rounded handle
-
Double cutting edge, with the blade transition set to 0.125 inches
This gives me clean definition while still printing reliably on my slicer.
Decorating Options: Printed, Hybrid, or Fully Hand-Piped
This cutter really shines when it comes to decorating flexibility.
Option 1: Fully Printed (Fastest)
-
Use CDL’s “Get Outline” feature
-
Print directly onto Eddie trays for perfect alignment
-
Great for efficiency and consistency
Estimated price: $5
Option 2: Hybrid (My Favorite)
-
Pipe the chick in yellow
-
Use Eddie to print sunglasses and wing outlines in black
-
Hand-pipe the beak afterward so it pops slightly
Estimated price: $6
Option 3: Fully Hand-Piped
-
Outline and flood by hand
-
Use CDL’s outline image or a light edible print as a guide
-
Perfect if you want maximum texture and dimension
Estimated price: $7
If you’re newer to cookie decorating, printing the outline lightly on the cookie is a fantastic way to build confidence. And if you don’t have an edible printer, edible ink pens are your best friend for this kind of design.
Who This Cookie Is For (and Fun Tag Ideas)
This isn’t a personalized cookie—and that’s intentional.
This design is perfect for:
-
Easter baskets for middle schoolers and high schoolers
-
Kids who think bunnies are “too babyish”
-
Teachers with a sense of humor
Some tag ideas to go with it:
-
“Stay cool, chick.”
-
“You’re one cool chick.”
-
“Thanks for making me one cool chick!” (teacher gift)
-
“Too cool for the Easter bunny.”
Pair it with bright packaging and it instantly feels modern and fun.
Why This Cutter Works for Home 3D Printing
This project is a great example of:
-
Turning a playful image into a functional cookie cutter STL
-
Making structural edits after upload instead of redesigning in Canva
-
Designing cutters specifically for real cookies, not just cute graphics
If you’re learning how to design cookie cutters for 3D printing, this is exactly the kind of image that benefits from CDL’s editing tools—and why many bakers switch after struggling with more rigid programs. Fun cutters like this are what keep seasonal presales fresh—and kids excited!