I know that it feels early to be talking about Easter, but this year Easter is the first weekend in April, and if there’s one thing I’ve learned as a baker, it’s that holidays sneak up fast. Planning early gives you breathing room and better designs.
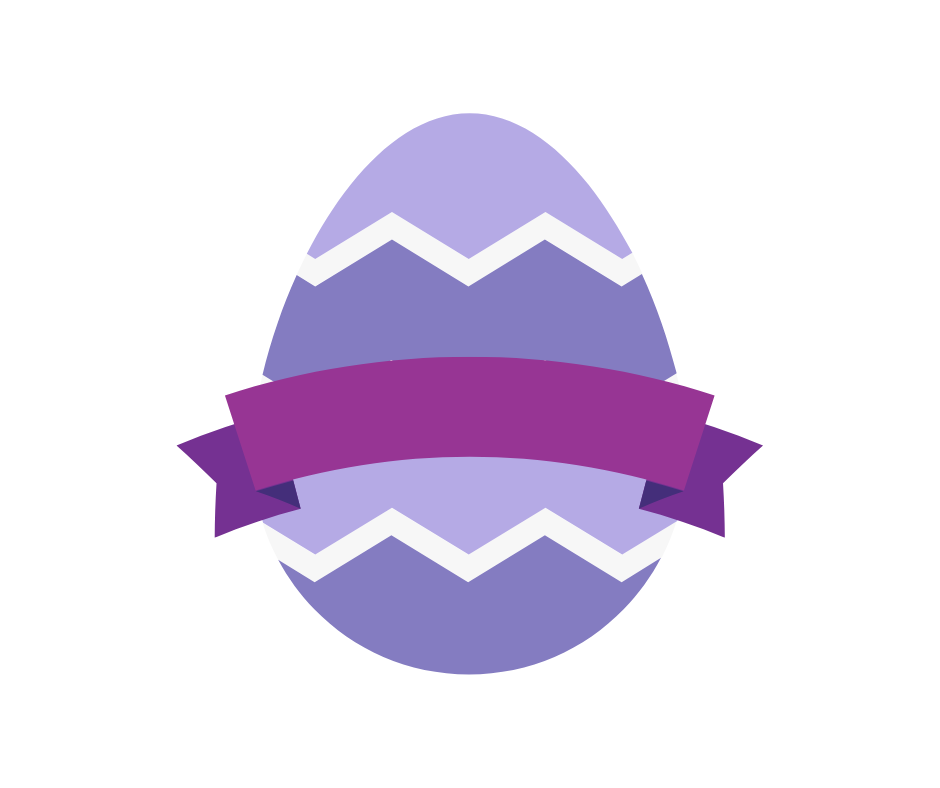
For my own business, I’ve found that classic Easter designs consistently sell best. Trendy cookies are fun, but when it comes to Easter baskets, place settings, and hostess gifts, customers tend to gravitate toward something timeless. That’s why I’m starting my Easter prep with a personalized egg cookie featuring a name banner.
This is the kind of cookie that works in multiple ways, such as:
-
Tucked into a child’s Easter basket,
-
Used as a place card for Easter brunch or dinner, and
-
Added to a hostess gift or dessert box.
Let me walk you through how I designed this cutter using Canva and Cookie Design Lab, and some of the decisions I make along the way. (You can also watch on YouTube.)
Starting in Canva: Simple, Free, and Fast
I always start in Canva, and specifically with a Facebook post template. I use it every time because it gives me a clean, predictable canvas without thinking too hard. To get started on this cutter, I head to Elements and search for an egg. I’m looking for:
-
A clean outline,
-
Minimal tiny details, and
-
Something that already feels close to my vision.
I find a free egg graphic I like, add it to my design, and resize it so I can clearly see what the cutter might look like.
Next, I search for a banner to layer on top of the egg. This part matters more than it might seem. I want:
-
Enough width to comfortably pipe a name,
-
A banner that I can make larger than the egg but with an easy outline to pipe, and
-
Something that will also act as a guide when I’m decorating later.
I land on an arched banner, add it to the design, and temporarily type my own name in a large font just to make sure it will work in real life, not just on screen. Once I’m happy, I name the design and download the image.
Moving into Cookie Design Lab (and Fixing a Small Issue Fast)
When I upload the image into Cookie Design Lab, I notice a small problem. The egg graphic has white lines that go all the way to the edge, and CDL is picking those up in the outline. Instead of going back to Canva (which is what I used to have to do), I head straight to the Background Cleanup tab in CDL. Using the color distance threshold slider, I lower the sensitivity just enough so the outline no longer cuts into those white lines. Problem solved in seconds without redesigning.
Refining the Outline for Decoration-Friendly Detail
With a clean outline, I move into Outline Editing and increase the number of points. This smooths the overall cutter shape and allows the cutter to follow the curves and crevices of the banner more closely. That extra detail adds visual interest and gives me a built-in guide when I’m decorating.
Sizing the Cutter
For this design, I size by width and go with 3.25 inches wide and 3.36 inches tall. It’s a great medium size that’s not too big for baskets or place settings, but still substantial. Plus, my dough recipe spreads a little.
I add the cutter name, which CDL automatically places on the straightest edge (one of my favorite little features). I can also adjust the name size with the slider.
Since the design is symmetrical, there’s no need to click the flip left/right box.
Handles, Blades, and Print Considerations
Then it’s on to the finishing touches. If you’ve read other entries, you know I always choose a rounded handle. It’s more comfortable and easier on my hands. Sometimes I also choose a wider handle.
Then I move on to blade sizing. The default in Cookie Design Lab is a 0.250 in blade with a thicker transition, but if you want a double cutting edge, size down to a 0.125 in blade. I prefer the double edge, which works beautifully with Prusa’s slicer. Andrew (the programmer behind CDL) has found that it can sometimes cause issues in Bambu’s slicer, so just be aware and test what works best for your setup.
For cutter depth, I choose 1 inch. It’s sturdier and feels like the high-quality cutters I used to buy but it does increase print time. The nice thing about CDL is that every part of the cutter is customizable: depth, wall thickness, blade height. If you need faster prints, you can choose lighter settings.
Downloading the Image (or Just the Outline)
For this design, I download not just the STL to 3D print, but also the outline-only image. The latter is a newer feature that some Eddie owners asked for. By downloading just the outline, you can print it directly on your tray for perfect alignment.
Since I don’t own a projector, this is a cutter I’d likely pair with Eddie to add the name. From there, I’d decide whether to pipe over it or leave it printed.
Pricing Strategy: Eddie vs Hand-Piped
How I decorate this cookie depends heavily on pricing and my customer base.
-
If I want a lower price point or my presale already includes more detailed, expensive designs, I’ll use Eddie for the name and offer this cookie for $1+ less.
-
If my customers are less price-sensitive, I’ll hand-pipe the name for more dimension and visual interest, and charge accordingly.
Neither option is “right” or “wrong.” What matters is knowing your customer, but that can seem daunting.
Knowing Your Customer (This Part Really Matters)
If you’re new to selling cookies, take a few minutes to define your ideal customer (marketing calls this a persona). Think about their:
-
Age,
-
Gender,
-
Income range,
-
Kids or no kids,
-
What their hobbies or interests are, and
-
If they value convenience or customization.
Chances are, your ideal customer is a lot like you except you chose to make the cookies instead of buying them. This is a key thing to keep in mind though, because a lot of us start making our own cookies because of the price point. In this aspect, you are not your ideal customer! Be sure to do your market research and see what people in your area are charging that offer similar products.
If you’ve been selling for a while, look at your past data and see:
-
What designs sold fastest?
-
Which price points performed best?
-
Did simpler cookies outperform detailed ones?
Even if you haven’t sold Easter cookies before, other holidays give you clues.
Pre-sales are especially helpful here since you know exactly how much to make, and you can test designs to inform future years.
A Design Worth Coming Back To
I probably won’t use this exact egg again until next Easter and that’s okay. It’s a classic, reusable design that I can see myself returning to year after year, tweaking colors, fonts, or names to keep it fresh.
And best of all? From Canva search to STL download, this whole process took just a few minutes. And both the STL and the image are here on the blog for you to download and use!
Want to learn more about making your own STL files to 3D print at home? Welcome to the Cookie Design Lab blog, where we talk about that as well as baking business topics such as pricing and personas. You can also check out our YouTube channel and email us at [email protected] for a code for one free week!